
mbg Contributor
Victoria Malloy is a Toronto-based freelance writer covering a range of topics with a focus on sustainability. Her work has appeared on Coveteur, The Zoe Report, Well + Good, Apartment Therapy, Natural Habitat and more.

April 19, 2023
Our editors have independently chosen the products listed on this page. If you purchase something mentioned in this article, we may
Food waste contributes to the climate crisis through its significant greenhouse gas footprint, emitting methane as it rots in landfills. Composting not only keeps food scraps out of landfills, but it also recycles nutrients back into the soil, effectively closing the loop between waste and new growth.
Composting can seem intimidating, but it doesn’t have to be. We did the digging for you to uncover the best composters for every skill level, and the expert-backed practices that will help you get the most out of them.
Quick peek at the best composters:
Choosing the right composter
According to the World Wildlife Fund, an estimated 6 to 8% of all human-caused greenhouse gas emissions could be reduced if we stop wasting food. Food is the single largest category of material sent to landfills, according to the U.S. Environmental Protection Agency1, and of the 25 million tons of wasted food generated by the residential sector in 2018, a mere 3% was composted.
Composting is something we can all do, whether you’re a gardener or not, and it comes with some serious benefits. Nutrients released from the decomposition of compost by microbes are used by plants and soil organisms, which help improve the health of your garden. Composting can also reduce or eliminate the need for store-bought fertilizer.
If you’re looking for a home composter, you’ll find plenty of options available. “The ‘right’ composter or composting setup is entirely dependent on your goals and the context you work with in your home,” says Alissa LaChance, owner and head consultant at Dirt Rich Compost.
Here’s a breakdown of the type of composters you’ll want to look at depending on your space:
If you have outdoor space:
For backyard composting, composter designs such as open-air, tumbler, or in-vessel composters are great options, according to environmental engineer Tracy Fanara, Ph.D. (And if you’re on a tight budget, you can also DIY your own composter out of a wooden box, a garbage can, or even just a hole in the ground.)
Vermicomposting, introducing worms into the mix to break down organic material, is another backyard method you can look into. It’s a quick way to create a super-nutritious soil product, but those who live in snowy climates won’t be able to do it year-round, LaChance warns.
If you don’t have outdoor space:
Devices like the Lomi and Reencle stand out as attractive options for people who are looking for a no-fuss, space-saving alternative to traditional composters. These electronic digesters can break down your food scraps in a matter of hours indoors.
But if you want a high-quality soil amendment for your plants or community garden, LaChance suggests steering clear of these machines since they’re not actually composting your scraps but rather heating and partially digesting them.
Instead, you can try vermicomposting. While the idea of keeping worms at home may not be for everyone, there are some great well-contained, compact, and unassuming vermicomposters that can be neatly tucked away. The speed and efficiency of the vermicomposting process also keeps odor to a minimum—a must for any indoor system.
If you’d rather use a community composter:
Depending on what’s available where you live, you can also collect your food scraps in your kitchen and drop them off at a composting site or have them picked up curbside. All you’ll need to do this in an easy-to-clean bin that sits on your kitchen counter or in your freezer to mitigate smells.
How we picked:
These composters are beginner-friendly and require minimal (or no) tools to put together.
Options for a variety of dwellings
On our list, there’s something for everyone—from homeowners with yards to urban condo dwellers.
Because let’s be honest: This is one of the biggest deterrents to composting.
We want to feed our garden, not the neighborhood critters, so these composters all have pest protections in place.
Our picks for the best composters:
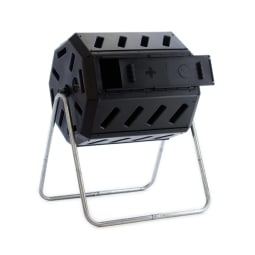
Best tumbler: FCMP Outdoor Dual Chamber Tumbling Composter
Pros
- Suitable for all climates
- No need to mix your compost by hand
- Pest-resistant
- Better aeration than standard composters for faster decomposition
- Made from recycled plastic
Cons
- Doesn’t hold as much compost as other options
- Requires assembly
Capacity: 37 gallons
Where to put it: Your yard
This is a great beginner-friendly tumbling composter due to its low-maintenance design. All you have to do is fill it up and give it a few turns every 2-3 days. A tumbling design means there’s no need to mix by hand, and built-in hand holds makes turning easy.
Aeration holes introduce plenty of oxygen to the process to reduce smells, while deep fins break up clumps inside the chamber. The body is made of BPA-free UV-inhibited recycled polypropylene, and the galvanized steel frame is corrosion-resistant. The bin can be used in a variety of climates.
Though it does take some time to assemble, reviewers note that the set-up instructions are clear and easy to follow.
Best vermicomposter: FCMP The Essential Living Composter

Pros
- Can be used indoors & outdoors
- Good for condo/apartment dwellers
- Modular, aesthetically-pleasing design
- Doesn’t smell
Cons
- Must purchase worms separately
- Must be brought indoors in snowy climates
- Fills up quickly/small capacity
Capacity: 6 gallons
Where to put it: Your yardYour patioYour basement
This vermicomposter uses nature’s digesters (worms!) to help eliminate food waste and produce nutrient-rich compost for your garden and house plants. A liquid, known as ‘worm tea’, collects in the reservoir base and can be mixed with water to make an excellent fertilizer for plants. This composter comes with two trays and you have the option of buying more online as you get the hang of the vermicomposting process. (Learn all about it here.)
While this bin can be placed outdoors, if you live in a snowy climate, you’ll need to bring it indoors in winter as the worms can’t withstand freezing temperatures.
Advertisement
This ad is displayed using third party content and we do not control its accessibility features.
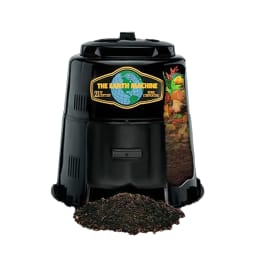
Best backyard: The Earth Machine NPL 300 Compost Bin
Pros
- Easy assembly
- Suitable for all climates
- Pest-resistant lid
- Adjustable ventilation
- 10-year warranty
Cons
- Manual mixing involved
Capacity: 80 gallons
Where to put it: Your yard
This is a popular style composter that is user-friendly and easily assembled by snapping together. Made of BPA-free, UV-inhibited recycled content, this composter features adjustable ventilation, a twist-locking pest-resistant lid, a lockable harvest door. It secures to the ground with durable pegs, making it a sturdy pick for any backyard, and it fits a ton of scraps.
Pro tip: to help speed up the composting time, cut out the sod under the composter to improve drainage and invite beneficial worms and microbes in.
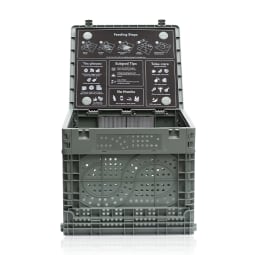
Best for beginners: Subpod Recycled Mini
Pros
- 2000+ 5-star reviews
- Easy, tool-free assembly
- Below-ground closed system is pest-proof and lockable
- Two-year warranty
Cons
- Must purchase worms separately (a variety of species suggested)
- A bit of extra maintenance required in cold temperatures
Capacity: 3 gallons
Where to put it: Your yard
This unique vermicomposter sits 90% underground, taking up minimal space in your yard. Where above-ground systems struggle to keep worms and microbes comfortable (and alive) when temperatures get too hot or too cold, this in-ground system provides insulation, keeping worms safe and happy year-round (though reviewers note a few tweaks will be required if temperatures dip below 55 degrees Fahrenheit).
Subpod is designed to compost up to 22 lbs of food waste per week and it’s suitable for a household of 1-4 people. This is also a good pick for people who are skittish around worms, as it’s pretty hands-off.
Advertisement
This ad is displayed using third party content and we do not control its accessibility features.
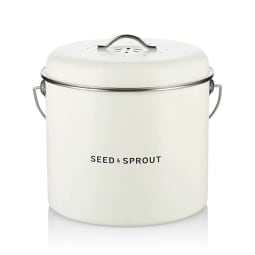
Best bin for the kitchen: Seed & Sprout Compost Bin
Pros
- Reusable/washable charcoal filter is excellent at preventing odors
- Durable and easy to keep clean
Cons
- Food scraps tend to stain the inside matte finish
- Expensive
Capacity: 8 liters
Where to put it: Your kitchen counter
This sleek stainless steel food scrap bin, with its matte oat finish, actually looks nice collecting scraps on your kitchen counter. You’ll notice zero odors thanks to the reusable odor-neutralizing charcoal filter outfitted on the underside of the snug-fitting lid. If you’re looking for a smaller kitchen caddy, it also comes in a mini (5 liter capacity) version.
Bonus: The brand operates 100% emissions-free at its HQ office and composts all of its food waste to recycle it back into their office garden.
Best bin for the kitchen: Bamboozle Kitchen Compost Bin
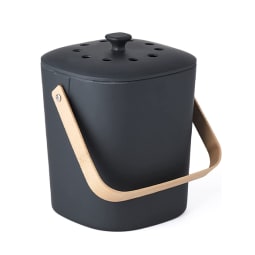
Pros
- Made of sustainable and biodegradable bamboo fiber
- Inexpensive
- Reusable/washable charcoal filter keeps odors at bay (comes with an extra filter)
- Available in a variety of colorways
Capacity: 3 liters
Where to put it: Your kitchen counterYour freezer
With over 1000 5-star reviews on Amazon, this compact food scrap bin sits inconspicuously on your countertop without taking up too much space or looking, well, like a food scrap bin. Available in a variety of colorways including graphite, terracotta and saffron, this bin has very little environmental impact thanks to its bamboo materials.
This is the bin that mindbodygreen’s Health & Sustainability director Emma Loewe uses in her New York City kitchen. “I love how inconspicuous this bin is, and the handle makes it really easy to carry from my counter to my freezer. I’ve also found that I can use it for other purposes at home, like storing dirty napkins until laundry day, which I appreciate,” Loewe says.
Advertisement
This ad is displayed using third party content and we do not control its accessibility features.
Best budget: OXO Good Grips Compost Bin
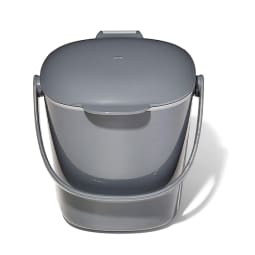
Pros
- Flip-up lid can be opened/closed easily with one hand
- Inexpensive
- Can be stored in the freezer to prevent odors
Cons
- Very small (but available in a larger version)
- No odor neutralizing filter
- Made of non-recycled plastic
Capacity: 3 liters
Where to put it: Your kitchen counterYour freezer
OXO, a brand known for thoughtfully-designed everyday objects, has created a food scrap bin that has amassed over 15,000 5-star reviews on Amazon. A great companion for food prep, the lid on this bin can be flipped opened and closed with one hand.
Loewe has used this one before too, and she notes that it’s easier to clean than other bins she’s tried. “Its rounded edges mean that food and grime don’t get stuck in there. I can just give it a quick wipe in the sink after each use and it’s good as new,” she says.
Tips for using your composter
If you’re new to the composting process, expect to be a little patient at first. LaChance notes that composting is both a science and an art, “so don’t give up if things aren’t working out properly on your first few tries.” Even though she’s been composting professionally for eight years, she still gets bad batches from time to time due to environmental factors.
1.
Know what goes in your bin.
It’s important to know what is compostable and what isn’t. Generally, kitchen scraps from fruit, vegetables, rice, pasta, crackers and cereal, eggshells, and nut shells, as well as most yard waste, can all be placed in your at-home compost bin.
But according to Fanara, you shouldn’t compost meats, fish and bones, plants that have been treated with insecticides or herbicides, dog or cat manure, oils and grease, bioplastics, dairy products, and things that won’t break down quickly like twigs and branches.
Certain scraps may prove problematic, such as citrus peels, which can make the soil too acidic, and onions and garlic, which as you might imagine can make things quite smelly.
RELATED READ: What Can Be Composted In A Backyard vs. A Commercial Facility
2.
Getting the carbon/nitrogen ratio right.
“The No. 1 mistake new composters make is having too much nitrogen or food scraps in their mix,” says LaChance, noting that the ratio of nitrogen (“greens” such as kitchen scraps, grass/garden clippings, etc.) to carbon (“browns” such as leaves, wood chips, cardboard, etc.) should be no more than 4:5 to 4 (food scraps) to 5 (browns).
If there is too much carbon, decomposition will slow, and if there is too much nitrogen, your compost will be really stinky and oozy, according to LaChance. If your compost doesn’t seem to be doing much, it’s either too dry or too high in browns. What you want to achieve is a happy medium between too dry and too wet.
“When you squeeze a handful of mix, you want the material to stick together slightly without falling apart easily,” says LaChance.
3.
Put it in the right place.
LaChance advises against placing your pile or composter in full sun. “Too much sun dries everything out, which will pause the composting process,” she says. If you have a good mix of carbon and nitrogen, the pile should heat up well on its own.
How long does composting take?
With any luck, you’ll have your first batch of incredibly fertile soil (which will be down at the bottom of your bin or pile) in about three to six months, according to Fanara.
Vermicomposting is generally faster than traditional methods, generating compost in two to three months.
Want to move things along faster? Adding some natural dirt and soil from your surrounding area can help aid the decomposition process because of the native microorganisms already in it, notes Fanara. She also points out that you can break scraps down first (such as crushing eggshells) to help speed things up. Turning your compost periodically helps with the aeration that is essential for aerobic bacteria in decomposing material. It’s important to note that in the winter, with colder temperatures, your compost will decompose at a slower pace.
Preventing smells and deterring pests
Unpleasant odors are a sign that something is off with your compost. Stinkiness could be due to a lack of air, nutrient imbalance, or food scraps left exposed.
“Be sure you’re not adding too many food scraps and calling every last dog in the neighborhood over,” says LaChance. You should also avoid adding meat and oily foods to your pile, which can attract unwanted pests.
Turning the pile can help keep odors away by warming and oxygenating the mixture, which Fanara suggests be done every few days. You can also top your turned mixture with an added layer of dirt or brown covering to help prevent smells. While most in-vessel composters are designed to be pest-proof and lockable, open-air piles and DIY vessels may pose a bit of a challenge if a critter discovers your composter.
If you’re concerned about the odors associated with storing your kitchen scraps and how they may attract pesky fruit flies, an easy solution is to store them in a suitable container in the freezer. Frozen scraps won’t decompose and will remain odorless until you’re ready to compost them.
The takeaway
Buying a composter is a great way to reduce your personal footprint and observe nature at work. Just be sure to choose the right one for your space and monitor it for funky smells, pests, and other signs of trouble. And don’t stop with compost! Here are a few other ways to make more sustainable food choices at home.