
As bodyweight exercises go, it’s hard to find fault with the push-up. It’s convenient, challenging, functional, and it builds muscle without beating up your joints. Among the countless variations of this classic move (e.g., T push-up, clapping push-up, archer push-up, decline push-up, offset push-up, etc.), diamond push-ups are one of the simplest and most accessible.
But that doesn’t mean they’re easy.
“They’re safer on the shoulder joint,” says trainer Jolie Kobrinsky, RKC, TRX, owner of Elektren Studio in Seaside, CA. “They’re also tougher to perform.”
Want to work this classic upper-body builder into your program? Read on.
Diamond Push-Ups: Step-by-Step Instructions
- Assume a push-up position (body straight from head to heels, core engaged, glutes squeezed, hands flat on the floor, and arms straight and in line with your shoulders). Move your hands together so that the tips of your thumbs and index fingers are touching (see the diamond shape?). This is the starting position.
- Keeping your elbows tucked to your sides (don’t let them flare), lower your torso until your chest lightly touches the backs of your hands. (Or as far as you can go without losing proper form.)
- Pause, and then push yourself back up to the starting position.
How to Make Diamond Push-Ups Easier
While you can perform the exercise on your knees to make it easier, a more helpful modification would be to perform it with your hands elevated on a stable surface, like a table, countertop, bench, or railing. As you become stronger, move your hands closer to the ground until you can perform the standard variation of this exercise.
Harder than the traditional move but not as hard as a single-arm or plyometric push-up, the diamond push-up is an intermediate-level strength exercise. So before you attempt this move, you should be able to complete at least 10 regular push-ups in a row with good form.
How to Make Diamond Push-Ups Harder
Once you can bang out 15 or more consecutive diamond push-ups with your hands on the ground, you can make the move harder with these changes, listed in ascending order of difficulty:
- Pause at the bottom of the move (without resting your chest on the floor).
- Slow down the eccentric (lowering) phase and accelerate the concentric (pushing-up) phase of each rep.
- Perform one-and-a-half reps: Lower yourself, go halfway up, lower yourself a second time and go all the way up — that’s one rep.
- Try the move with your feet elevated, starting with a low box or step (an aerobic step works well).
- Perform it while wearing a weighted vest.
- Combine any of the above techniques.
Diamond Push-Ups: Muscles Worked
These are the muscle groups that you’ll feel working during the diamond push-up.
Chest

Diamond push-ups distribute the workload among your upper body’s “pushing” muscles, AKA your chest, shoulders, and triceps. In traditional push-ups, your chest muscles (pectorals) take the brunt of the work.
Shoulders
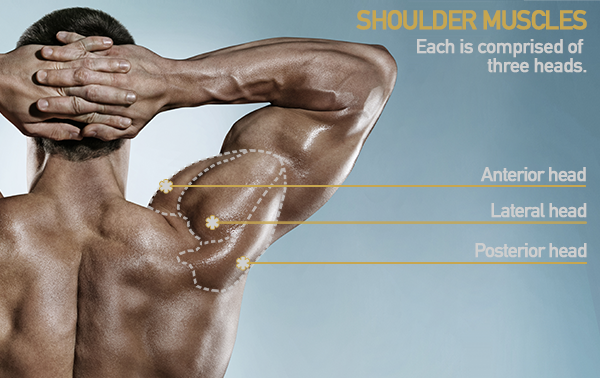
The front of your shoulders (deltoids) are supporting players in this movement. By placing your hands closer to one another, you increase the emphasis on the deltoids.
Triceps
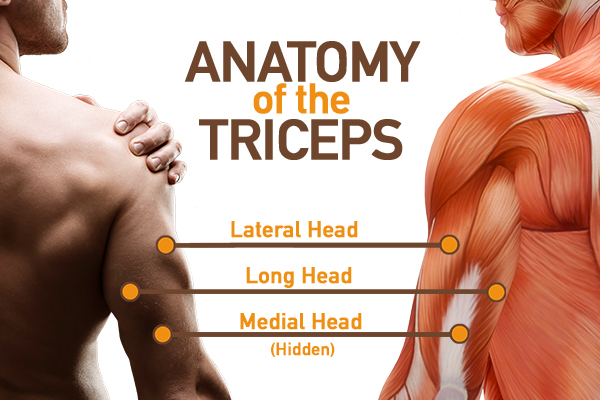
The backs of your arms (triceps) are more heavily emphasized with diamond push-ups. They have the task of helping you fully extend or straighten your arms, which, with the closer hand positioning, becomes harder to do.
Core muscles
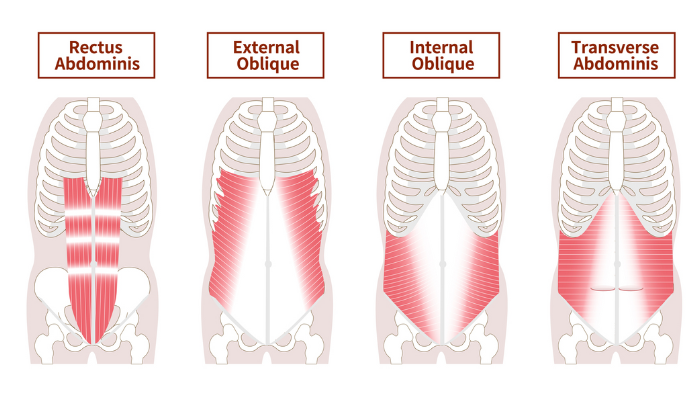
All types of push-ups (including the diamond push-up) work your core muscles, which are responsible for keeping your spine stable and supported. Those muscles include include the rectus abdominis (i.e., your abs), the transverse abdominis, the external obliques, and the erector spinae.